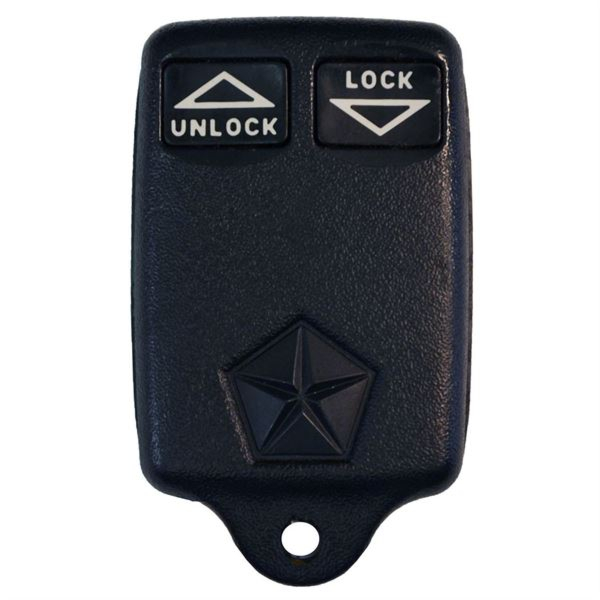
Procedure #1 Step-by-Step How To Programming Instructions:
- INSERT a key into the Ignition and TURN the Ignition to the ON position (just before cranking).
- PRESS and HOLD the UNLOCK button on a working remote for four (4) to ten (10) seconds.
- While holding the UNLOCK button, PRESS the PANIC button for one (1) second and RELEASE both buttons at the same time. A chime will sound within three (3) seconds to indicate entry into Programming Mode.
- PRESS ANY button on the same remote until you hear another chime indicating that the remote has been successfully re-programmed. This Step MUST be done within 30 seconds of hearing the first chime in Step 3.
- Within the next 30 seconds PRESS ANY button on the next remote to be programmed to your Vehicle.
- REPEAT Step 5 for any additional remotes to be programmed to your Vehicle.
- Test all remotes. Programming is now complete.
- If these programming instructions helped save you time and money, please consider sharing our website with friends and family so they can do the same.
Procedure #2 Step-by-Step How To Programming Instructions:
- Using a working remote, PRESS the LOCK button five (5) times at two (2) second intervals to re-synchronize the remote.
- INSERT a key into the Ignition and TURN the Ignition to the ON position (just before cranking).
- PRESS and HOLD the UNLOCK button on a working remote for four (4) to ten (10) seconds.
- While holding the UNLOCK button, PRESS the PANIC button for one (1) second and RELEASE both buttons at the same time. A chime will sound within three (3) seconds to indicate entry into Programming Mode.
- PRESS the LOCK and UNLOCK buttons simultaneously on the same remote then RELEASE. The Vehicle will chime to indicate that it has recognized the remote.
- PRESS and RELEASE the UNLOCK button on the same remote. The Vehicle will again chime to indicate successful programming of that remote. This Step MUST be done within 30 seconds of hearing the first chime in Step 3.
- Within 30 seconds of completing Step 5, PRESS the LOCK and UNLOCK buttons on the next remote to be programmed and then RELEASE. You will again hear a chime indicating that the Vehicle has recognized the remote.
- PRESS and RELEASE the UNLOCK button on the remote. The Vehicle will again chime to indicate successful programming of that remote.
- REPEAT Steps 6-7 on any additional remotes to be programmed to your Vehicle.
- Test all remotes. Programming is now complete.
- If these programming instructions helped save you time and money, please consider sharing our website with friends and family so they can do the same.
1994 - 1997 Chrysler LHS
Method-1 97 service manual says to: 1 find data kink connector under steering column. 2 turn ignition on 3 ground pin 1 upper left most pin this is the programming line. the door locks will lock then unlock. 4 press any key on the transmitter, locks will cycle to confirm if you have a second transmitter press any button, wait for lock to cycle. 5 remove ground from pin 1 6 Done, test it out
Method-2 Remove the bezel to the right of the steering wheel that has an a/c vent and the traction control switch (or not) and unplug (or find) the traction control connector. Place a jumper between pins 1 and 4 to place the receiver in teach mode. Operate the power door lock button on the door and push the lock/unlock button on the fob. If you have 2 fobs, do the 2nd one as well, it will remember 2. Replace the connector and bezel.
1994 - 1996 Chrysler New Yorker
Remove the bezel to the right of the steering wheel that has an a/c vent and the traction control switch (or not) and unplug (or find) the traction control connector. Place a jumper between pins 1 and 4 to place the receiver in teach mode. Operate the power door lock button on the door and push the lock/unlock button on the fob. If you have 2 fobs, do the 2nd one as well, it will remember 2. Replace the connector and bezel.
1994 - 1995 Chrysler Town & Country
1. Open and lower the glove box by releasing the catch tabs on either side. 2. Insert key and turn to the on position (do not start the engine.) 3. Locate the programming connector behind the glove box. Connector must be jumped take either a jumper wire or bent paperclip and jump the connector. Connect one end of the wire or clip to the inside of the connector and the other end to a metal surface of the vehicle. Locks will cycle from lock to unlock. 4. Press any button on the remote being programmed, the locks will cycle again confirming successful programming. Repeat this step for any additional remotes 5. Remove jumper wire or clip to exit programming mode.
1996 - 1997 Chrysler Town & Country
ATTENTION: You MUST HAVE one working remote to add one more to the system. If you do not have one working remote right now then these instructions will not work. You will have to have a Locksmith use a computer to program the first remote for you.
1. Turn ignition to run position (as far as you can go without starting engine). 2. Using any Working remote, press the UNLOCK button for 4 to 10 seconds. 3. Within the specified 4 to 10 seconds, continue pressing the UNLOCK button and press the PANIC button for 1 second and release both buttons at the same time. A chime will sound within 3 seconds to indicate that the vehicle has entered remote programming mode. 4. Within 30 seconds of the chime, press any button on all remotes to be programmed including previously programmed remotes. A chime will sound after each remote is programmed. 5. Turn ignition to OFF and remove key. 6. Test all remotes.
1994 - 1995 Dodge Caravan
1. Open and lower the glove box by releasing the catch tabs on either side. 2. Insert key and turn to the on position (do not start the engine.) 3. Locate the programming connector behind the glove box. Connector must be jumped take either a jumper wire or bent paperclip and jump the connector. Connect one end of the wire or clip to the inside of the connector and the other end to a metal surface of the vehicle. Locks will cycle from lock to unlock. 4. Press any button on the remote being programmed, the locks will cycle again confirming successful programming. Repeat this step for any additional remotes 5. Remove jumper wire or clip to exit programming mode.
1996 Dodge Caravan
To program a remote you must already have a working remote. I you do not have a working remote you must take to the item to a dealership or automotive locksmith for programming. Procedure 1 1. Insert key into the ignition turn it to the ON position ( do not start the car) 2. Press and Hold Unlock on the functioning remote for 10 seconds. 3. While holding the Unlock button press the Panic button for one second. Release both buttons at the same time. Vehicle will chime signaling programming mode. 4. Press any button on the 1st remote to reprogram vehicle will chime again. 5. Press any button on additional remote to program a second remote. 6. Turn off ignition to exit programming. Procedure 2 1. Insert key into the ignition turn it to the ON position ( do not start the car) 2. Press and Hold Unlock on the functioning remote for 10 seconds. 3. While holding the Unlock button press the Panic button for one second. Release both buttons at the same time. Vehicle will chime signaling programming mode. 4. Press the lock and unlock button together on the remote and release. Vehicle will chime press and release the Unlock button and the vehicle will chime again signaling programming. 5. Press and release Lock and Unlock together on the second remote vehicle will chime. Press and release Unlock button on the remote vehicle will chime again signaling successful programming. 6. Turn off ignition to exit programming.
1997 Dodge Caravan
ATTENTION: You MUST HAVE one working remote to add one more to the system. If you do not have one working remote right now then these instructions will not work. You will have to have a Locksmith use a computer to program the first remote for you.
1. Turn ignition to run position (as far as you can go without starting engine). 2. Using any Working remote, press the UNLOCK button for 4 to 10 seconds. 3. Within the specified 4 to 10 seconds, continue pressing the UNLOCK button and press the PANIC button for 1 second and release both buttons at the same time. A chime will sound within 3 seconds to indicate that the vehicle has entered remote programming mode. 4. Within 30 seconds of the chime, press any button on all remotes to be programmed including previously programmed remotes. A chime will sound after each remote is programmed. 5. Turn ignition to OFF and remove key. 6. Test all remotes.
1994 - 1995 Dodge Grand Caravan
1. Open and lower the glove box by releasing the catch tabs on either side. 2. Insert key and turn to the on position (do not start the engine.) 3. Locate the programming connector behind the glove box. Connector must be jumped take either a jumper wire or bent paperclip and jump the connector. Connect one end of the wire or clip to the inside of the connector and the other end to a metal surface of the vehicle. Locks will cycle from lock to unlock. 4. Press any button on the remote being programmed, the locks will cycle again confirming successful programming. Repeat this step for any additional remotes 5. Remove jumper wire or clip to exit programming mode.
1996 - 1997 Dodge Grand Caravan
To program a remote you must already have a working remote. I you do not have a working remote you must take to the item to a dealership or automotive locksmith for programming. Procedure 1 1. Insert key into the ignition turn it to the ON position ( do not start the car) 2. Press and Hold Unlock on the functioning remote for 10 seconds. 3. While holding the Unlock button press the Panic button for one second. Release both buttons at the same time. Vehicle will chime signaling programming mode. 4. Press any button on the 1st remote to reprogram vehicle will chime again. 5. Press any button on additional remote to program a second remote. 6. Turn off ignition to exit programming. Procedure 2 1. Insert key into the ignition turn it to the ON position ( do not start the car) 2. Press and Hold Unlock on the functioning remote for 10 seconds. 3. While holding the Unlock button press the Panic button for one second. Release both buttons at the same time. Vehicle will chime signaling programming mode. 4. Press the lock and unlock button together on the remote and release. Vehicle will chime press and release the Unlock button and the vehicle will chime again signaling programming. 5. Press and release Lock and Unlock together on the second remote vehicle will chime. Press and release Unlock button on the remote vehicle will chime again signaling successful programming. 6. Turn off ignition to exit programming. |