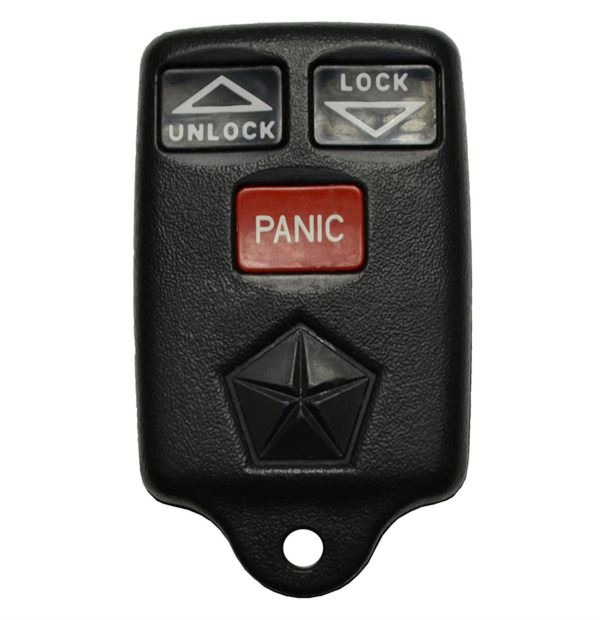
1994 - 1999 Chrysler/Dodge/Jeep/Plymouth 3 Button Keyless Entry Remote Fob - GQ43VT7T
Fits:
1996 - 1998 Chrysler Town & Country
1996 - 1998 Dodge Caravan
1996 - 1998 Dodge Grand Caravan
1998 Dodge Dakota (not self programmable)
1998 Dodge Durango (not self programmable)
1996 - 1999 Dodge Grand Caravan
1994 - 1997 Dodge Intrepid
1997 - 1999 Dodge Neon
1998 Dodge Ram 1500/2500/3500 (not self programmable)
1996 - 1998 Jeep Grand Cherokee (not self programmable)
1997 - 1999 Plymouth Neon
1997 - 1999 Plymouth Prowler
1996 - 1998 Plymouth Voyager
1996 - 1998 Plymouth Grand Voyager
If you are not 100% satisfied with your product for any reason, you may return the product within 180 days of ordering for a replacement. Please see our return policy for further information.
SKU | 575 |
---|---|
FCC Number | GQ43VT7T |
OE Part # | 04686366, 56008761,56008762, 56021903, 4686076 |
Support | Your purchase gives you 100% free e-mail and phone technical support from our expert staff. |
Programming Information | SOME models come with self programming instructions. You can view them under the 'Programming Instructions' tab. All other models will need an automotive locksmith to come out and program the unit in for you. NOTE: When looking under the 'Programming Instructions' tab please look for your specific model as the programming instructions vary. |
Product Condition | Refurbished |
Programming Instructions | 1996 - 1998 Chrysler Town & Country 1997 - 1999 Plymouth Prowler YOU MUST HAVE A WORKING REMOTE FOR THIS PROCEDURE TO WORK. IF YOU DON'T HAVE A WORKING REMOTE THEN YOU MUST HAVE A REMOTE PROGRAMMED BY LOCKSMITH USING DIAGNOSTIC EQUIPMENT. PLEASE READ ENTIRE PROCEDURE BEFORE PERFORMING. SOME VEHICLES MAY USE ONE OF TWO PROCEDURES. IF PROCEDURE 1. DOES NOT WORK THEN PLEASE USE PROCEDURE 2. Programming procedure #1. Obtain all remote transmitters for this vehicle. 1. Put key in ignition and turn ignition switch to ON position (as far as you can turn key without cranking engine). 2. Press and hold UNLOCK on a currently functioning remote for 4 to 10 seconds. 3. While holding the UNLOCK button during the 4 to 10 second period, press the panic button for one second and release both buttons at the same time. A chime should sound within three seconds to indicate the vehicle has entered programming mode. 4. Press any button on the remote used in step 3. You should hear an audible tone indicating that remote has been re-programmed. This step must be done within 30 seconds of hearing first chime in step 3. 5. Within 30 seconds of completiong step 4. press any button on the next remote. Repeat step 5. for all additional remotes including working remotes. 6. Programming is now complete. Turn ignition off and test remotes to ensure proper programming.
Programming Procedure #2 Obtain all remote transmitters for this vehicle. 1. Put key in ignition and turn ignition switch to ON position (as far as you can turn key without cranking engine). 2. Press and hold UNLOCK on a currently functioning remote for 4 to 10 seconds. 3. While holding the UNLOCK button during the 4 to 10 second period, press the panic button for one second and release both buttons at the same time. A chime should sound within three seconds to indicate the vehicle has entered programming mode. 4. Press the LOCK and UNLOCK buttons simultaneously on the same remote used in step 3. then release. You should hear an audible tone indicating that the remote was recognized. Once tone is heard press and release the UNLOCK button on that remote. A chime should sound indicating that the remote has been programmed. This must be done within 30 seconds of step 3. 5. Within 30 seconds of completing step 4. press the LOCK and UNLOCK button on the next remote then release. You should hear an audible tone indicating that the remote was recognized. Once tone is heard press and release the UNLOCK button on that remote. A chime should sound indicating that the remote has been programmed. Repeat step 5. for all additional remotes including working remotes. 6. Programming is now complete. Turn ignition off and test remotes to ensure proper programming. 1994-1996 Dodge Intrepid: Obtain all remote transmitters for this vehicle. 1. Remove the middle vent bezel from the center of the dashboard. Locate the 6 pin traction control connector behind the vent. It will be black in color. Connector should be connected to the vent bezel or the traction control switch, if connected to the traction control switch you must unplug it. 2. Insert key into ignition and turn ignition switch to the ON position. 3. Using a jumper wire or a paper clip bent in the shape of a "U" jump pin 1 to pin 4. Ensure there are metal contacts or pins in cavities 1 and 4. When done properly the doors will automatically lock and then unlock to show that vehicle is in programming mode. 4. Press any button on the first remote to be programmed. Locks will cycle again to indicate vehicle recognized remote. If programming a second remote press any button on second remote to be programmed, locks will cycle again to indicate that second remote was recognized. 5. Programming is now complete, turn ignition to OFF position, remove jumper wire, and test remotes to ensure proper programming. 1997 Dodge Intrepid:
Obtain all remote transmitters for this vehicle. 1. Insert key into ignition and turn ignition switch to the ON position. (Turn as far as you can without cranking the engine) 2. Locate the Data Link Connector (DLC). It will be under the dash on the drivers side. Use the diagram above to identify pins 1 and 4. Notice that the DLC connector is tapered. You can use this to help identify the proper pins. Using a suitable jumper wire jump pin 1 to pin 4. Ensure that there are metal connector ends in the cavities that are referenced in this procedure. Once the jumper wire is installed it needs to remain there throughout this process until instructed to remove. 3. Press any button on the first remote to be programmed. If the signal is recognized the vehicle will Lock then Unlock the doors automatically. 4. Repeat step 3 for any additional remotes to be programmed. The doors will again Lock then Unlock automatically after each successful remote programming. 5. Remove jumper wire and remove key from ignition as programming is complete. Test each remote to ensure proper programming.
1997 - 1999 Dodge Neon: Obtain all remote transmitters for this vehicle. 1. Identify the programming connector. It will be located in the upper edge of the passenger side cowl trim panel. The programming connector will be a single dark green wire with a red moulded connector on the end of it. 2. Using a suitable jumper wire jump the programming connector to ground. This means contact one end of the wire to the connector and the other end to a non-painted metal surface. 3. Insert key into ignition and turn ignition switch to the ON position. 4. Press any button on the first remote to be programmed. To confirm successful programming the door locks will Lock and then Unlock automatically. Repeat this step for any additional remotes that you want programmed to this vehicle. 5. Remove jumper wire and turn ignition off. Test remotes to ensure proper programming. 1997 - 1999 Plymouth Neon: Obtain all remote transmitters for this vehicle. 1. Identify the programming connector. It will be on the drivers side under the dash taped to the wiring harness just to the left of the steering column. It will be a single green wire with a black rubber insulator on the end of it. 2. Using a suitable jumper wire jump the programming connector to ground. This means contact the metal in the connector with one end of the wire and contact a non-painted metal surface with the other end of the wire. 3. Insert key into the ignition and turn the ignition switch to the ON position. (Just shy of cranking the engine) 4. Press any button on the first remote. The locks will cycle from Lock to Unlock to show successful programming. Repeat this step for each additional remote to be programmed. 5. Remove jumper wire, turn ignition to OFF and remove key. Test all remotes to ensure they function.
1998 Dodge Dakota 1998 Dodge Durango 1998 Dodge Ram 1500/2500/3500 1996 - 1998 Jeep Grand Cherokee: This remote/key is not self programmable. You will need to locate a local locksmith to have this product programmed to your vehicle. The cost for key cutting/program will vary depending on your location. |
msrp | 112.99 |